Bước 1. Tạo đối tượng Quad:
- Vào GameObject --> 3D Object --> chọn Quad: lúc này tạo ra được đối tượng Quad - đối tượng này sau này chính là background chuyển động lặp lại.

Bước 2. Kéo thả vào một hình background cần làm lặp lại, nhớ sét sang dạng Texture, cụ thể sét như sau:
   . Texture type: Texture
   . Wrap Mode: Repeat
   . Filter Mode: Bilinear
   . Max size: 2048

Bước 3: click vào background texute và kéo thả vào đối tượng Quad ở trên

Bước 4. Tạo mã script chẳng hạn đặt tên: ScrollBackground.cs, viết code:
using UnityEngine;
using System.Collections;

public class ScrollBackground : MonoBehaviour {
public float _Speed = 3f;
public Renderer rend;
// Use this for initialization

void Start() {
rend = GetComponent<Renderer>();
}
// Update is called once per frame
void Update () {
rend.material.mainTextureOffset = new Vector2 (Time.time * _Speed, 0f);
}
}

Bước 5: Gắn script (file ScrollBackground.cs) vào đối tượng Quad ở trên. Bấm và chạy thử kết quả như mong đợi.


Hướng dẫn clone game FlappyBird
Mô tả các thành phần trong game: ...

Bước 1: Download resource
Trong thư mục Asset lần lượt tạo các thư mục: right click vào Asset --> create --> chọn Folder
- Resources: lưu tài nguyên hình ảnh
- Scripts: lưu mã nguồn
- Animations: lưu các sprite động
- Scenes:
- Prefabs:

Bước 2: Tạo sprite
Kéo tệp tin *.psd vào thư mục Resources --> click chọn hình
Ở mục Inspector:
 - TextureType: chọn Sprite(2D and UI)
 - Sprite Mode: chọn Multiple
--> sau đó chọn Sprite Editor -->
 - Bấm vào mục Slice --> chỉnh sửa lại các sprite cho như ý sao đó nhớ chọn Apply trên cửa sổ Sprite Editor. Như vậy đã tạo ra được các sprite

Bước 3: Tạo hình nền BackGround - Viết Script di chuyển BG
- Tạo GameObject: background gồm 2 thành phần sky (set layer = 0) và đất (set layer = 2). Số layer lớn ở ngoài cùng.
- Tạo Prefabs: cho background --> Các đối tượng tạo ra từ Prefabs thì chỉ cần thay đổi một thuộc tính nào đó trong Prefabs thì tất cả các đối tượng khác cũng thay đổi theo.

  + Thêm tốc độ di chuyển backgroud (lưu ý đặt biến public float SPEED), chỉnh từ giao diện trên prefabs background.
- Viết Scripte cho background: để bg di chuyển
void Update () {
transform.Translate(Vector3.left * SPEED * Time.deltaTime);
}

Bước 4: Tạo BGLooper - để các bg khác đụng vào BGLooper thì sẽ quay lại phía sau
- add Component Box Collider 2D cho.
- add Component Rigidbody 2D, lưu ý: để thuộc tính: Gravity Scale = 0; --> ko có trọng lượng
- Thêm mã nguồn đụng cái BGLooper thì sẽ quay lại
void OnTriggerEnter2D(Collider2D collider) {
if (collider.name == "BGLooper") {
Vector3 pos = this.transform.position;
float widthOfBGObject =  ((BoxCollider2D) collider).size.x;
pos.x += widthOfBGObject * numBG;
this.transform.position = pos;
}
}

Bước 5: Tạo các ống nước
- Tạo GameObject Pipe
- Add 2 cái Box Collider 2D cho ống phía trên và ống phía dưới, set vùng va chạm
- Add component Rigidbody 2D, lưu ý: để thuộc tính: Gravity Scale = 0; --> ko có trọng lượng
- Add script: Pipe
- Tạo Prefads: cho ống nước --> Mục đích: ....
- Viết mã nguồn để ống nước di chuyển
        void Update () {
transform.Translate(Vector3.left * SPEED * Time.deltaTime);
}
- Code ống nước di chuyển gặp BGLooper thì set lại vị trí phía sau:
void OnTriggerEnter2D(Collider2D collider) {
if (collider.name == "BGLooper") {
Vector3 pos = this.transform.position;
pos.x += distancePipe * numBG;
pos.y = Random.Range(MinY, MaxY);
transform.position = pos;
}
}

Bước 6: Tạo animation cho chú chim
- Chọn 3 sprite chim sau đó kéo thả vào vùng Hierachy. Tạo đối tượng GameObject Bird, kéo clony_bird_sprite_12 thả vào Bird. --> chúng ta có gameobject Bird.
- Viết mã nguồn cho chú chim chuyển động
public float jumpVelocity = 3.0f;
float g = -9.8f;

void Update () {
//x = x0 + v0 * t + a * t * t /2
transform.position += Vector3.up * (jumpVelocity * Time.deltaTime + g * Time.deltaTime * Time.deltaTime / 2);
//vt = v0 + a * t
jumpVelocity += g * Time.deltaTime;

if (Input.GetMouseButtonDown(0)) {
jumpVelocity = 2.5f;
}
}
- Xét va chạm giữa chú chim và ống nước:
 + Đặt tag cho các ống nước là: Pipe  --> để sau này dễ tìm các đối tượng là loại ống nước
void OnTriggerEnter2D(Collider2D collider) {
if ( collider.gameObject.tag == "Pipe")
{
jumpVelocity = 0;
}
}

---Hướng dẫn cách debug trên Unity.

Nội dung:
1. Cài đặt Java JDK:
2. Tải Eclipse:
3. Cấu hình tham chiếu tới Android SDK:
4. Sử dụng Android SDK Manager:
-------------------------------------------
1. Cài đặt Java JDK:
 - Tải và cài đặt Java JDK: http://www.oracle.com/technetwork/java/javase/downloads/index.html
 - Lưu ý chọn đúng bản:
          . win32: Windows x86
          . win64: Windows x64

2. Tải Eclipse: (bản này có sẵn sdk 17)
 - Win32: https://drive.google.com/open?id=0B8tAQ0_sJKCSSkVxZVV4NUYxNUk
 - Win64: https://drive.google.com/open?id=0B8tAQ0_sJKCSZklEcGVNNUI3UVU
 - Tải Anndroid SKD có các platforms sau: ...
 
3. Cấu hình tham chiếu tới Android SDK:
- Mở Eclipse lên vào thanh tool bar chọn Window --> Preferences --> chọn Android --> chọn Browse --> chọn đường dẫn tới bộ sdk android --> Apply ---> Ok

4. Sử dụng Android SDK Manager:
Lập trình tương tác đa chạm
- Xử lý tương tác touch, pin, pan, rotate,…

----
Lập trình multimedia
- Play audio – video
- JetPlayer
- Chụp ảnh – truy xuất album ảnh
- Giới thiệu về lập trình xử lý – tạo hiệu ứng

--

Lập trình đồ họa – hoạt hình
- Vẽ trên Canvas
- Tăng tốc đồ họa
- Lập trình hoạt hình

--

Viết ứng dụng kết nối dịch vụ web service:
      - Dùng thư viện Volley để GET và POST dữ liệu lên server PHP
- Phân tích dữ liệu trả về kiểu XML – JSON
-------
1. Xây dựng ứng dụng phía server: liên quan đến tạo host php free, đưa web service lên host và tạo tên cơ sở dữ liệu & bảng cơ sỡ dữ liệu
 Hướng dẫn tạo host php free: tham khảo link http://thanhtra.nguyen.free.fr/web/lamweb.php
+ Vào trang https://www.000webhost.com/ tạo một tài khoản host
+ Hướng dẫn đưa web services lên host: download phần mã nguồn server ở đây hoặc cuối bài. Dùng công cụ FileZilla Client để copy tệp tin mã nguồn php lên server.
Lưu ý: Thay đổi nội dung tệp tin ..\android_login_api\include\config.php về: HOST, USER, PASSWORD, DATABASE cho phù hợp với tên cơ sở dữ liệu trên server của bạn. Xem hình dưới:
+     Hướng dẫn tạo cơ sở dữ liệu trên server:
           Tạo tên cơ sở dữ liệu: chẳng hạng 
           → Chọn mục MySQL → Sau đó điền tên cơ sở dữ liệu a7787746_android (MySQL database name) và tên  → user name như hình bên dưới:
           Tạo bảng cơ sở dữ liệu bằng câu lệnh SQL: bảng tên users
     create table users(
       uid int(11) primary key auto_increment,
       name varchar(50) not null,
       email varchar(100) not null unique,
       password varchar(80) not null,
     );


Sáu đó chọn bảng users → chọn Browse để thấy dữ liệu đã chèn thành công vào bảng users.
--> Để đưa dữ liệu vào database ta chạy lệnh sau để test chèn dữ liệu vào bảng dữ liệu:
http://pushnotificationdemo.net84.net/?tag=register&name=nguyenvanx&email=nguyenvanx@gmail.com&password=123456

- Có thể dùng tool trong addon của chrome để test post dữ liệu tool: postman rest client 
Cách dùng:

2. Xây dựng ứng dụng phía client:
Cấu trúc project:

Copy thư viện Volley vào thư mục libs như hình trên: 
- Giới thiệu về thư viện Volley:
     Tại Google I/o 2013  Google đã giới thiệu với toàn thế giới về thư viện mạng Volley trong phát triển ứng dụng Android. Các bạn cũng đã hình dung được Volley là gì ? Tóm tắt lại , Volley là một Networking Library để quản lý các request Network  và lưu trữ những response không cần các Developer viết nhiều code như trước . Các tools bên trong Volley cho phép cùng một lúc thưc hiện nhiều request trên các thread khác nhau với các mức độ ưu tiên (priority ) khác nhau. Tất cả request được thực hiện và lưu trữ trong bộ nhớ cache giúp co việc reload lại dữ nhiều nhanh hơn. Toàn bộ response được lưu trong memory  vậy nên nó không phải là 1 ý tưởng hay cho việc tải về những dữ liệu lớn như music hay movies. Nhưng nó lại là tuyệt với với những loại dữ liệu như JSON, Image, String ...

- Eclipse:
Link: https://drive.google.com/file/d/0B8tAQ0_sJKCSSEpRUXdUM2wyR2s/view?usp=sharing
Hoặc download: https://android.googlesource.com/platform/frameworks/volley

- Android studio: trong tệp tin build.gradle thêm:
   compile 'com.android.volley:volley:1.0.0'

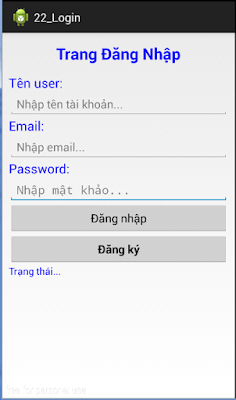
Thiết kế layout:
layout_register.xml:
<LinearLayout xmlns:android="http://schemas.android.com/apk/res/android"
    xmlns:tools="http://schemas.android.com/tools"
    android:id="@+id/LinearLayout1"
    android:layout_width="match_parent"
    android:layout_height="match_parent"
    android:layout_marginTop="15dip"
    android:layout_marginLeft="10dip"
    android:layout_marginRight="10dip"
    android:orientation="vertical"
    tools:context="com.login.MainActivity" >

    <TextView
        android:layout_width="wrap_content"
        android:layout_height="wrap_content"
        android:layout_gravity="center"
        android:text="Trang Đăng Nhập"
        android:textColor="#0000FF"
        android:textSize="25sp"
        android:textStyle="bold" />

    <TextView
        android:id="@+id/TextView01"
        android:layout_width="match_parent"
        android:layout_height="wrap_content"
        android:layout_marginTop="15dip"
        android:text="Tên user:"
        android:textColor="#0000FF"
        android:textSize="20sp" />

    <EditText
        android:id="@+id/editText_User"
        android:layout_width="match_parent"
        android:layout_height="wrap_content"
        android:ems="10"
        android:hint="Nhập tên tài khoản..." />

    <TextView
        android:id="@+id/textView1"
        android:layout_width="match_parent"
        android:layout_height="wrap_content"
        android:text="Email:"
        android:textColor="#0000FF"
        android:textSize="20sp" />

    <EditText
        android:id="@+id/editText_Email"
        android:layout_width="match_parent"
        android:layout_height="wrap_content"
        android:hint="Nhập email..." />

    <TextView
        android:id="@+id/textView2"
        android:layout_width="match_parent"
        android:layout_height="wrap_content"
        android:textColor="#0000FF"
        android:textSize="20sp"
        android:text="Password:" />

    <EditText
        android:id="@+id/editText_Password"
        android:layout_width="match_parent"
        android:layout_height="wrap_content"
        android:layout_weight="0"
        android:hint="Nhập mật khảo..."
        android:inputType="textPassword" >

        <requestFocus />
    </EditText>

    <Button
        android:id="@+id/btnDangNhap"
        android:layout_width="match_parent"
        android:layout_height="wrap_content"
        android:text="Đăng nhập" />

    <Button
        android:id="@+id/btnDangKy"
        android:layout_width="match_parent"
        android:layout_height="wrap_content"
        android:layout_gravity="center"
        android:text="Đăng ký"
        android:textStyle="bold" />

    <TextView
        android:id="@+id/textView_Status"
        android:layout_width="match_parent"
        android:layout_height="wrap_content"
        android:text="Trạng thái..."
        android:textColor="#0000FF"
        android:textSize="15sp" />

</LinearLayout>

AndroidManifest.xmlThiết lập kết nối internet
<uses-permission android:name="android.permission.INTERNET"/>


Mã nguồn java:
+ Tệp tin RegisterActivity.java:
package com.login;

import java.util.HashMap;
import java.util.Map;

import org.json.JSONArray;
import org.json.JSONException;
import org.json.JSONObject;

import com.android.volley.AuthFailureError;
import com.android.volley.Request;
import com.android.volley.RequestQueue;
import com.android.volley.Response;
import com.android.volley.VolleyError;
import com.android.volley.toolbox.StringRequest;
import com.android.volley.toolbox.Volley;

import android.app.Activity;
import android.os.Bundle;
import android.util.Log;
import android.view.View;
import android.view.View.OnClickListener;
import android.widget.Button;
import android.widget.EditText;
import android.widget.TextView;

public class RegisterActivity extends Activity implements OnClickListener {
      
       EditText inputFullName;
       EditText inputEmail;
       EditText inputPassword;
       Button btnRegister;
       Button btnLogin;    
       TextView statusMessage;
             
       private static int TYPE_REGISTER = 1;
       private static int TYPE_LOGIN = 2;
      
       RequestQueue requestqueue;
       String name, email, password;
       String url = "http://pushnotificationdemo.net84.net/";
      
       @Override
       public void onCreate(Bundle savedInstanceState) {
              super.onCreate(savedInstanceState);
              setContentView(R.layout.layout_register);
             
              inputFullName = (EditText) findViewById(R.id.editText_User);
              inputEmail = (EditText) findViewById(R.id.editText_Email);
              inputPassword = (EditText) findViewById(R.id.editText_Password);
              statusMessage = (TextView) findViewById(R.id.textView_Status);
              btnRegister = (Button) findViewById(R.id.btnDangKy);
              btnLogin = (Button) findViewById(R.id.btnDangNhap);
             
              requestqueue = Volley.newRequestQueue(this);
             
              //Đăng ký sự kiện cho button
              btnRegister.setOnClickListener(this);
              btnLogin.setOnClickListener(this);
       }

       @Override
       public void onClick(View v) {
              switch (v.getId()) {
                     case R.id.btnDangKy:
                     {
                           name = inputFullName.getText().toString();
                           email = inputEmail.getText().toString();
                           password = inputPassword.getText().toString();
                           VolleyPost(TYPE_REGISTER);
                           break;
                     }
                     case R.id.btnDangNhap:
                     {
                           name = inputFullName.getText().toString();
                           email = inputEmail.getText().toString();
                           password = inputPassword.getText().toString();
                           VolleyPost(TYPE_LOGIN);
                           break;
                     }
              }
       }
      
       public void VolleyPost (final int type) {
              StringRequest strRequest = new StringRequest(Request.Method.POST, url,
                     new Response.Listener<String>() {
                           @Override
                           public void onResponse(String response) {
                                  statusMessage.setText(response.toString());
                           }
                     },
                     new Response.ErrorListener() {
                           @Override
                           public void onErrorResponse(VolleyError volleyerro) {
                                  Log.i("Erro Volley", volleyerro.toString());
                           }
                     }){
             
                     @Override
                     protected Map<String, String> getParams()
                           throws AuthFailureError {
                           Map<String, String> params = new HashMap<String, String>();
                                  if (type == TYPE_REGISTER) {
                                          params.put("tag", "register");
                               params.put("name", name);
                               params.put("email", email);
                               params.put("password", password);                                      
                                  } else if (type == TYPE_LOGIN) {
                                          params.put("tag", "login");
                               params.put("email", email);
                               params.put("password", password);
                                  }
                 return params;
                     }
              };
              requestqueue.add(strRequest);//add
       }
}

Download mã nguồn server php:
https://drive.google.com/file/d/0B8tAQ0_sJKCSclY3Y1IxblZ6VE0/view?usp=sharing

Download mã nguồn ứng dụng:
--> Kết quả:

Một số link tham khảo về thư viện Volley: